Goal : Deploy Magic xpi projects automatically running azure Pipelines
Prequisites :
- Access to Azure Devops console
- At least 2 windows machines (DEV machine, QUAL machine for example) with Magic xpi installed
- Git enabled on the Dev machine(see « Azure Devops – Git – Magic xpi » article)
1/ Assume that you have set up git for you Magic xpi project (branch DEV)
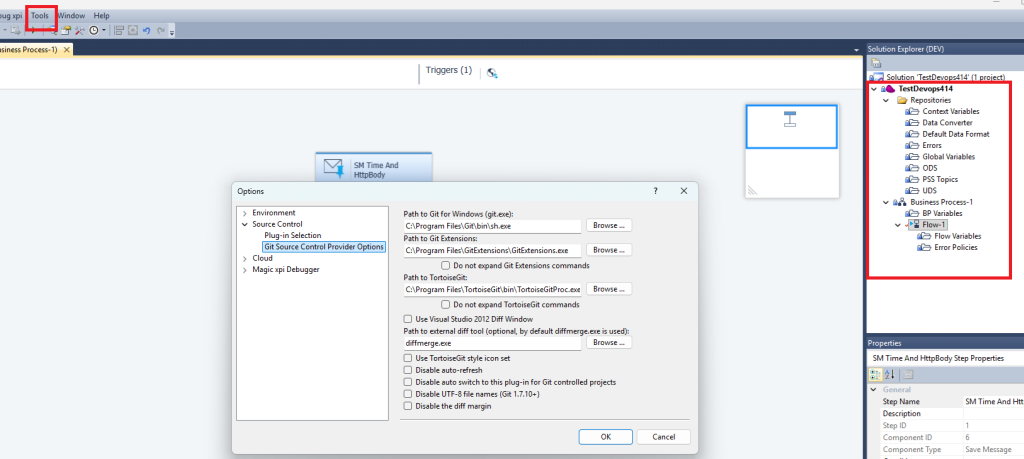
Before doing your push, prepare if necessary all the config files (ifs.ini, start.xml,start.xml.triggers,resources.xml,services.xml,calendars.xml, ) with credentials for qualification environment (see step 19/)
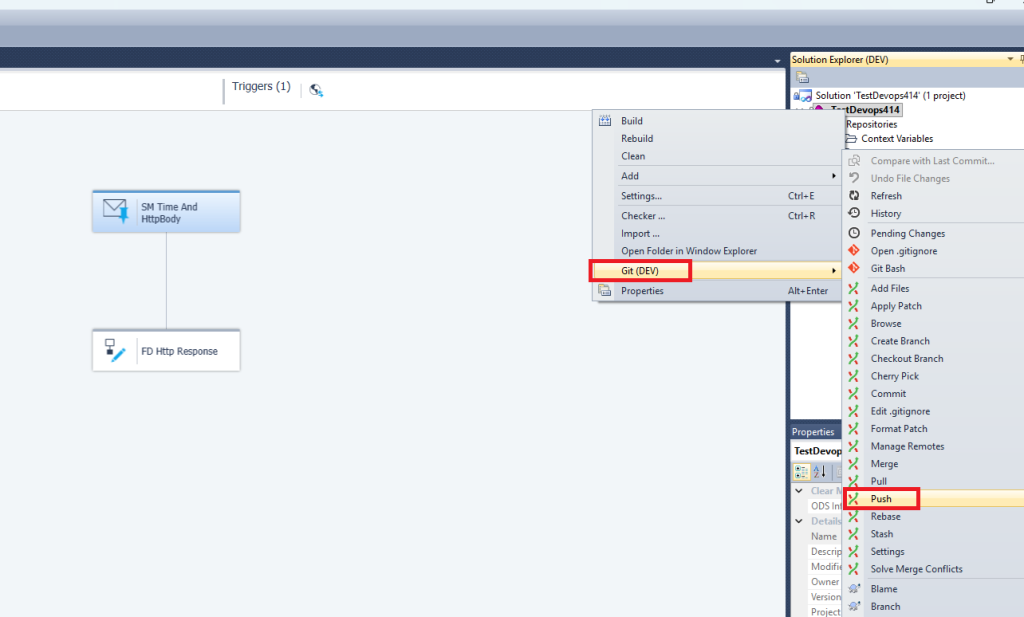
2/ Push your project from « DEV » local branch to « DEV » remote branch (« DEV » remote branch must be created in the devops console before proceeding)
Right click on the project and choose Push
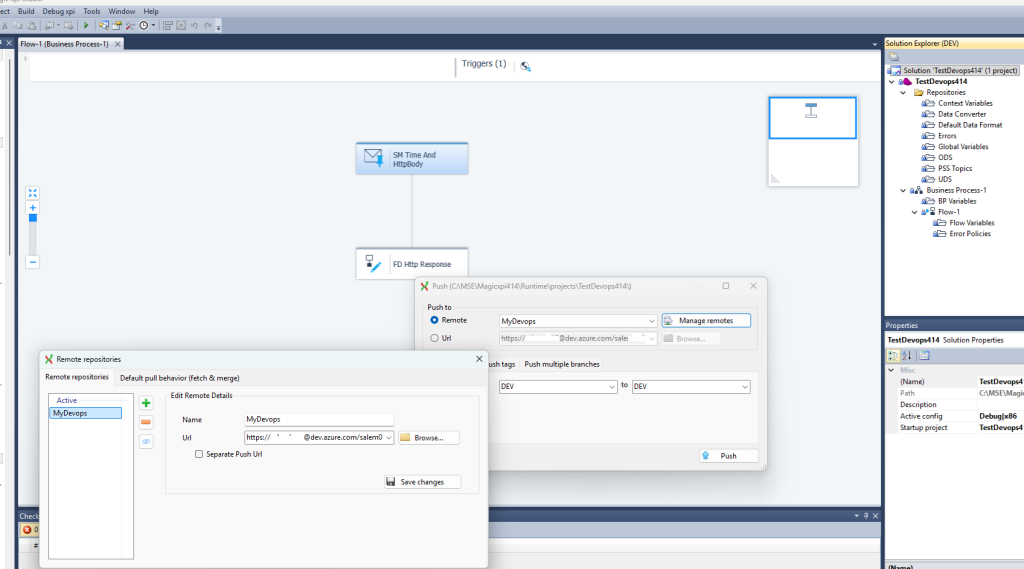
Click Push to send the project to the azure devops server
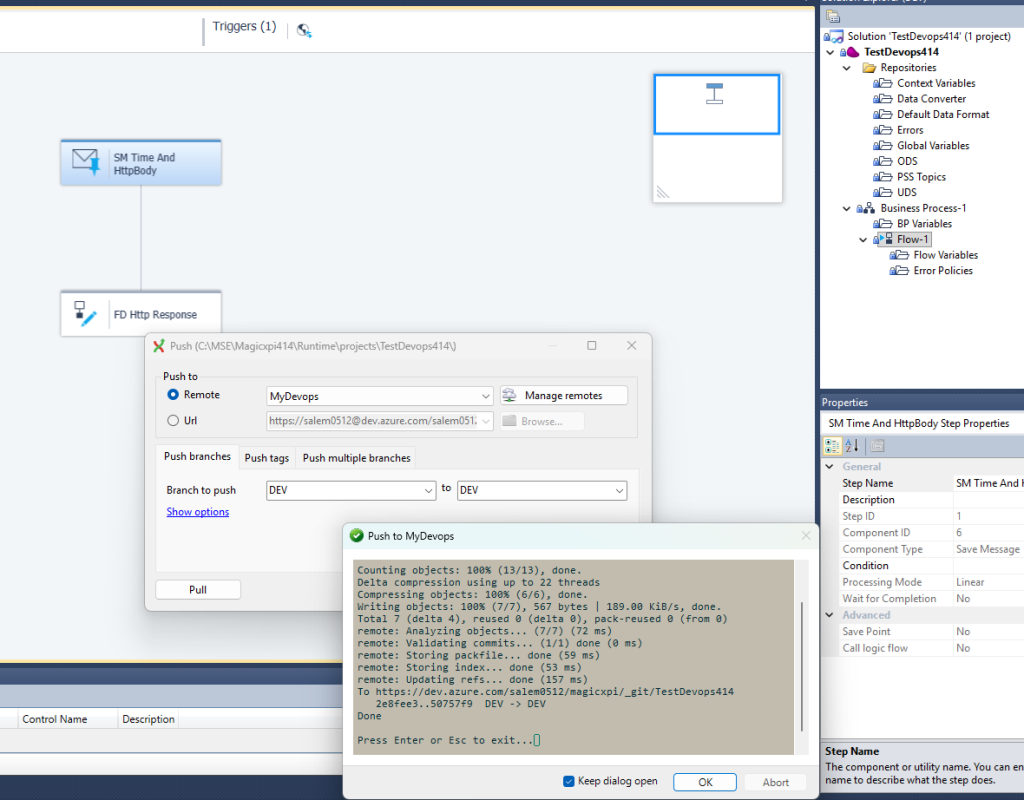
3/ You should see the project on the Devops azure console
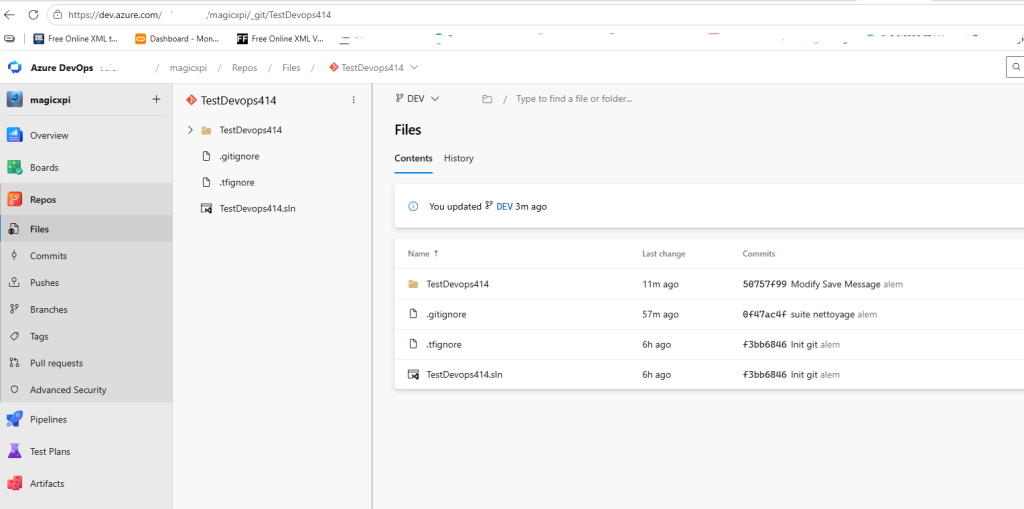
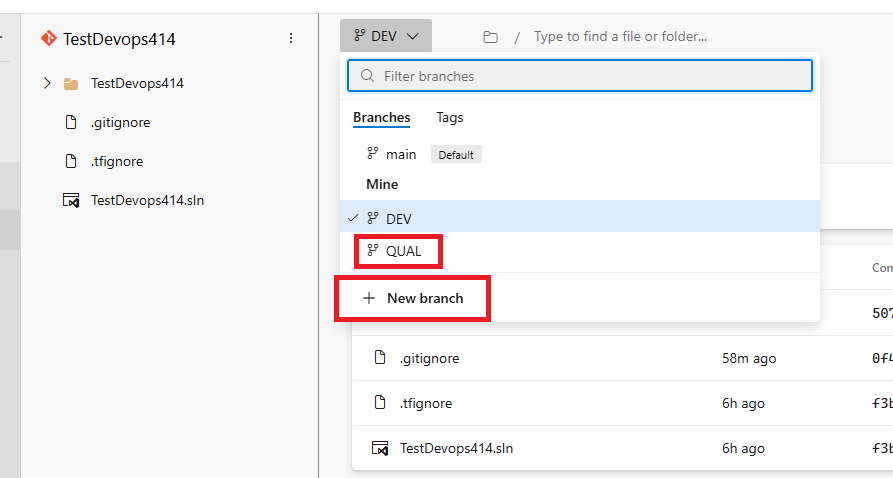
4/ Create the QUAL Branch on the server
5/ At this point, we will add an Agent pool and deploy the azure devops Agent on the QUAL machine
Click Project Settings (bottom left) => Agent Pools
Choose a self-hosted pool and grant access permissions to all pipelines
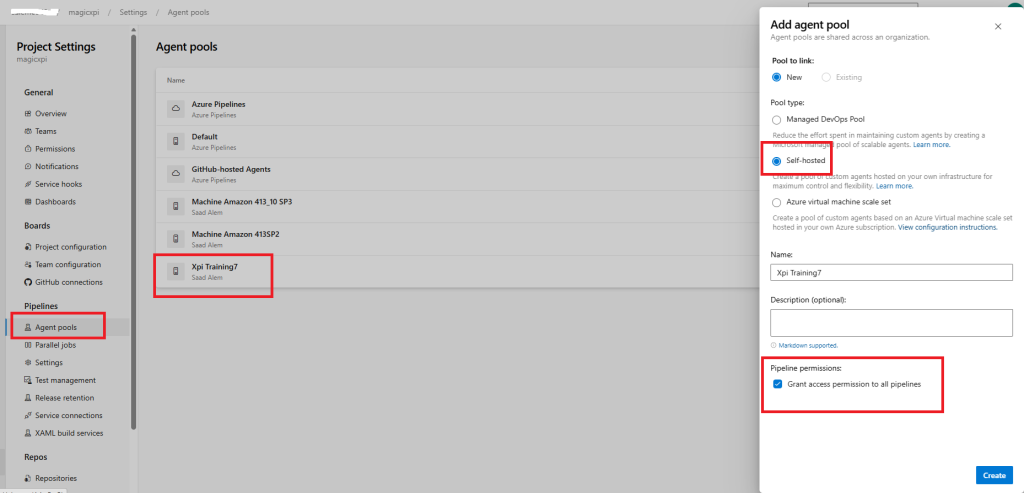
after creating the pool, click on New agent
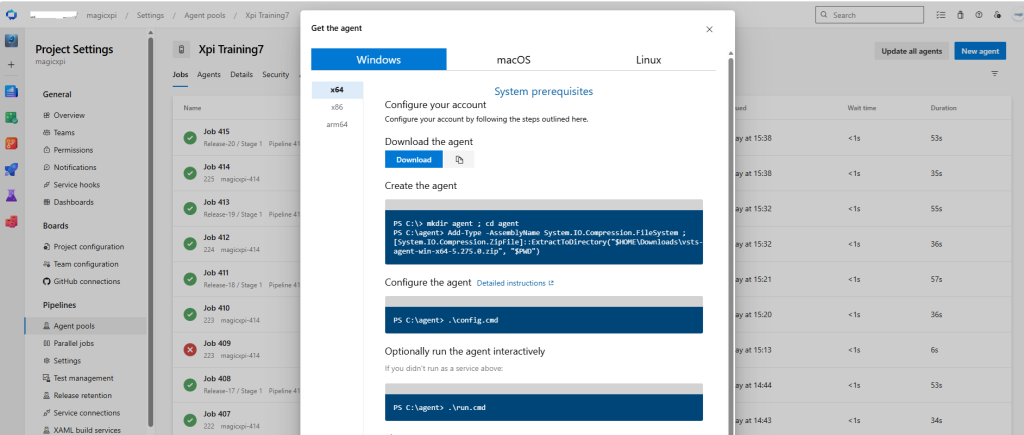
You get 3 powershell commands to execute on the qual machine where you want to deploy your magic xpi project (you can download the zip file)
6/ Create a PAT and keep you token in a safe place
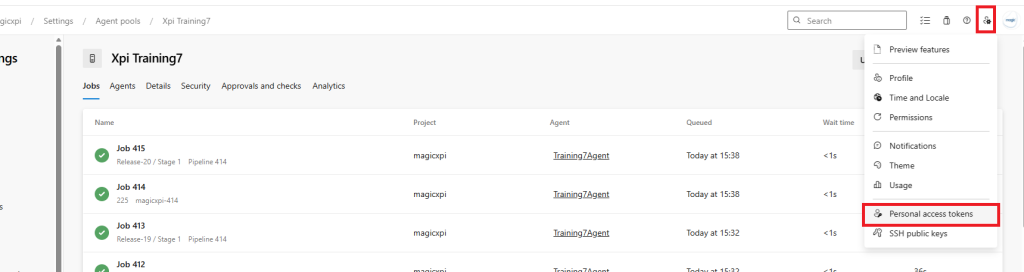
7/ Copy the zip file on the qual machine and unzip the file
Run the config.cmd powershell script
Enter the Organization URL
Press Enter and pass the PAT and press Enter
Enter the agent pool, give the exact name from previous step (5)
Enter an agent name : Training7Agent
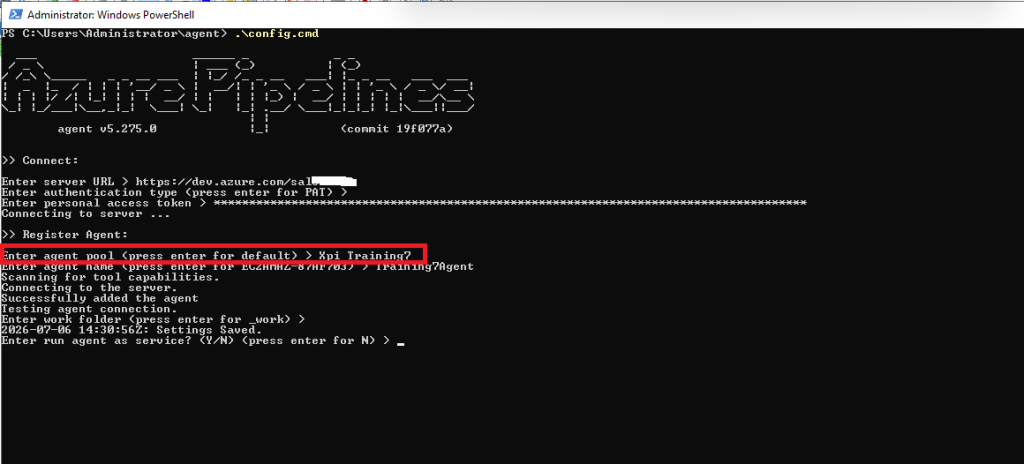
Choose default for the work folder (_work)
You can set the agent to run as service or as a command line. For the test, i will run it as a command line.
Enter N twice
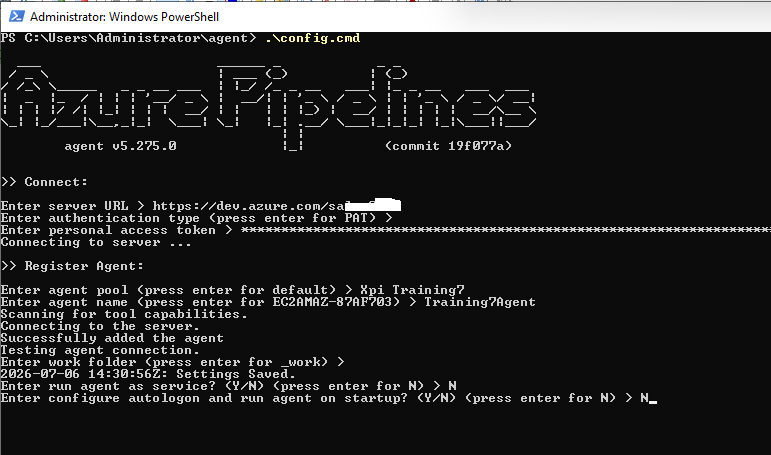
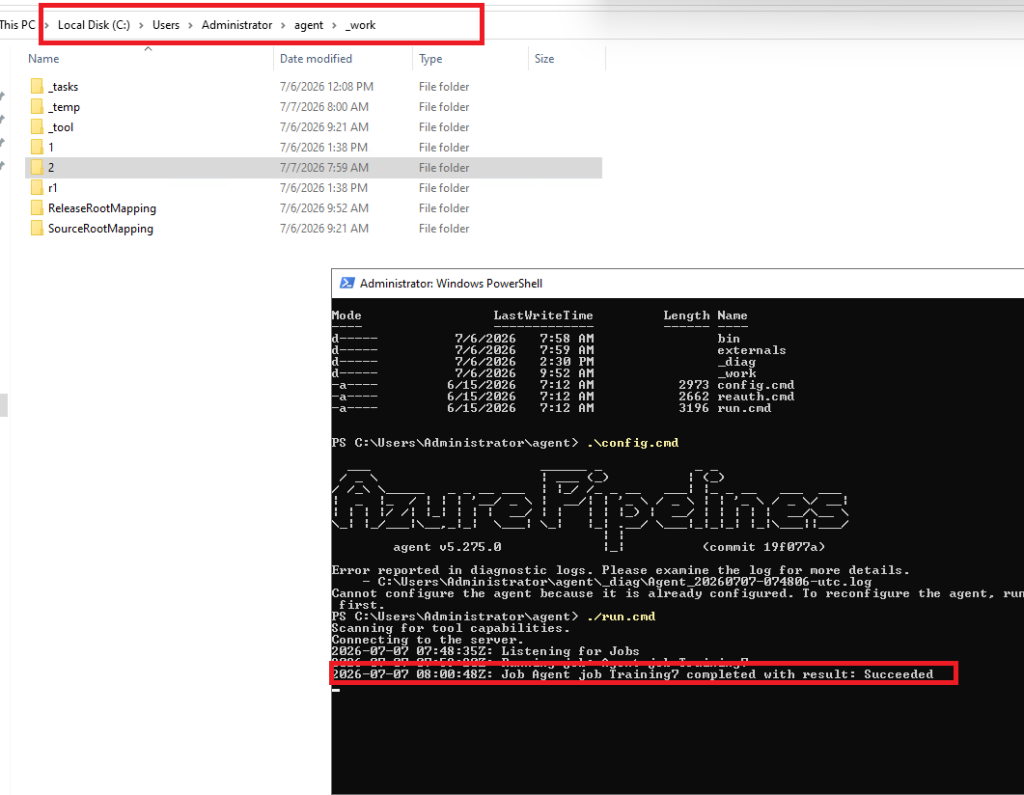
8/ Execute the run.cmd powershell script to run the agent
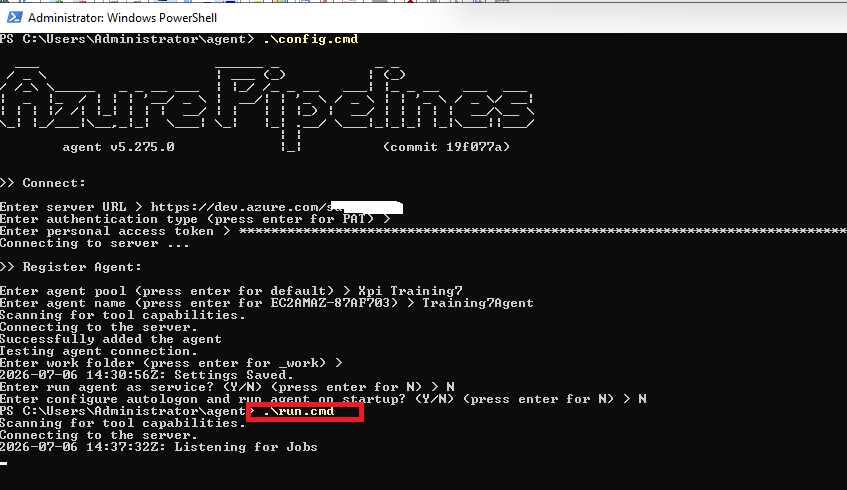
You can control in the azure devops console that the Agent is running
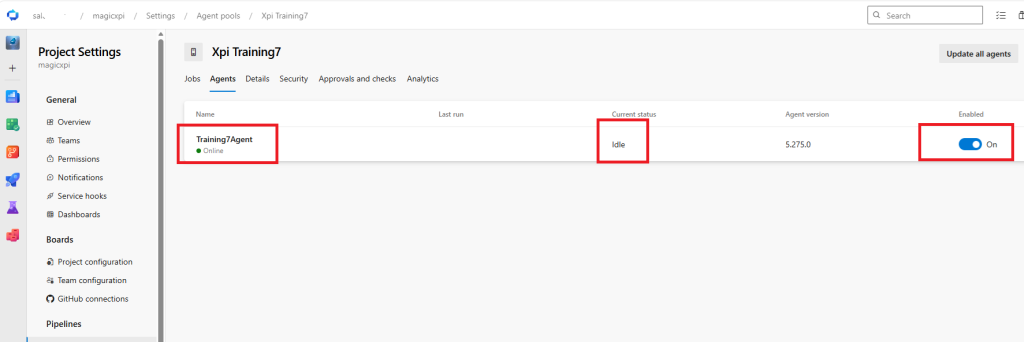
9/ Create a New pipeline to build an artifact
Click on the Left Menu (Pipelines)

Click New pipeline and use the classic editor
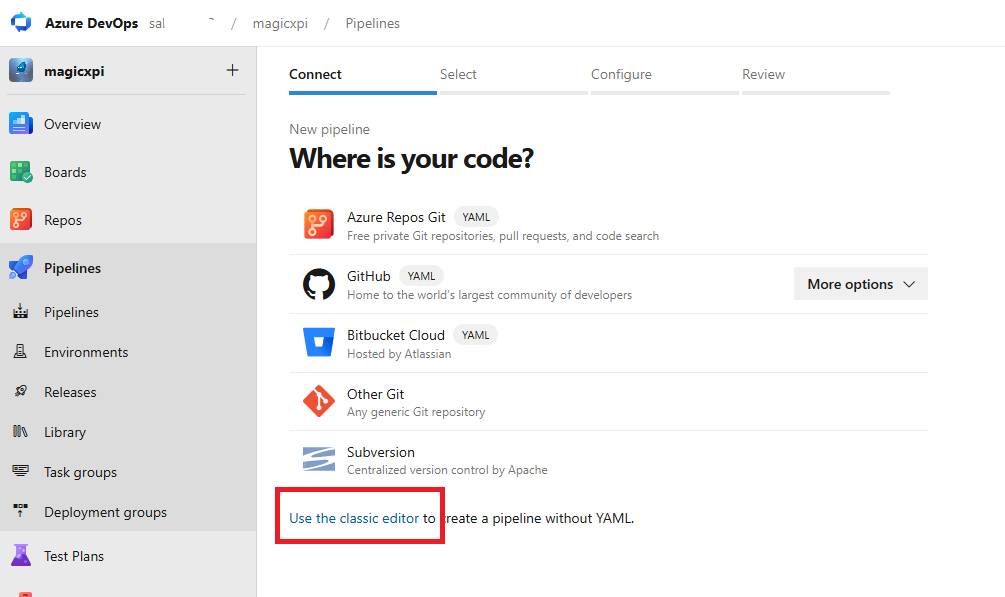
Choose Azure Repos Git, repository and QUAL for default branch
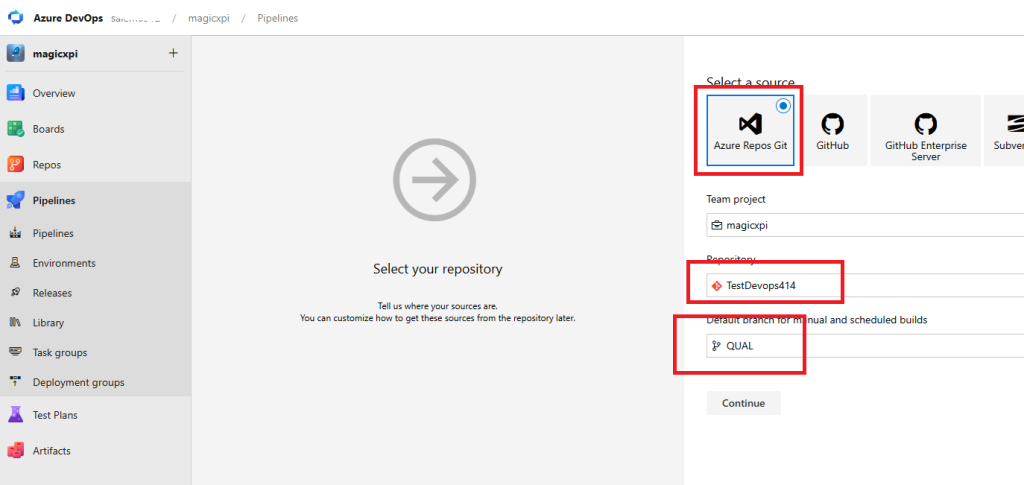
Click Continue and Empty job
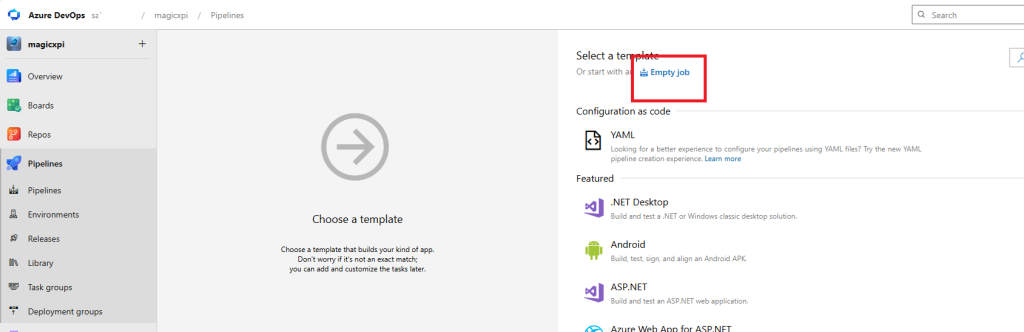
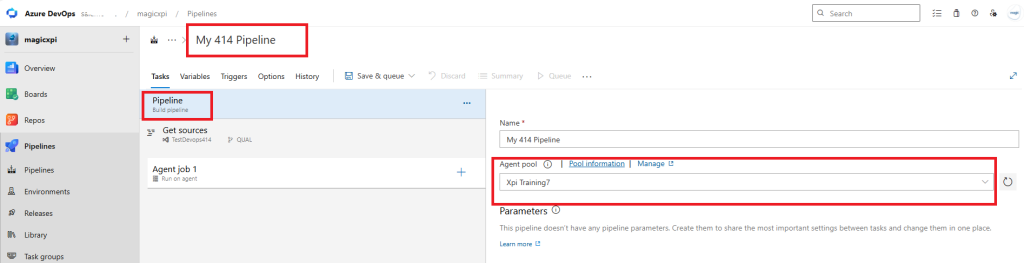
Choose the agent Pool (in my case : Xpi Training7) and change the pipeline name
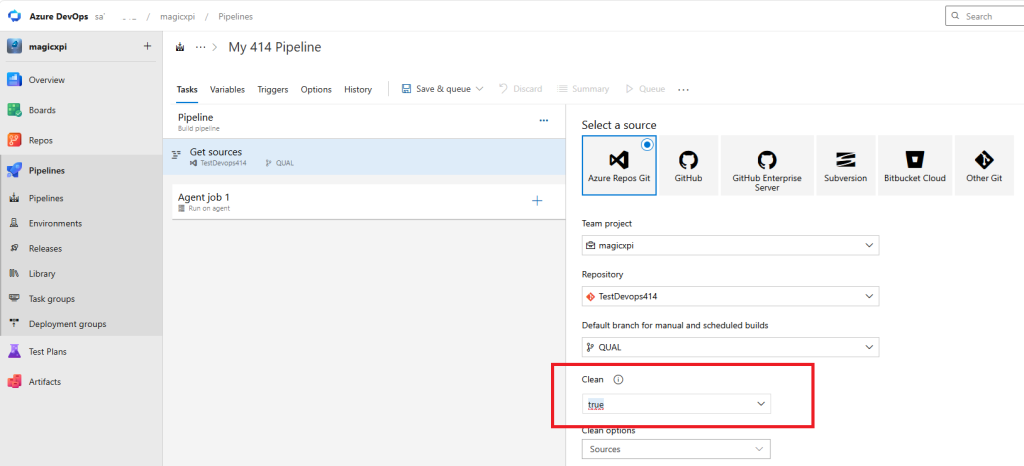
At the Get sources level, set the repository, the default branch and set Clean to true
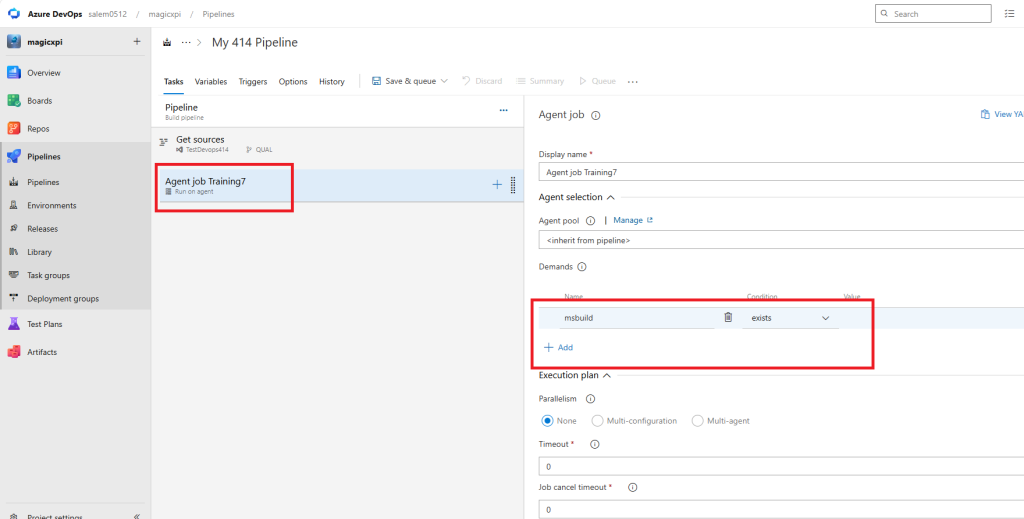
At the Agent job 1 level, change the name to Agent job Training7 and add msbuild exists in the demands
10/ Add 4 tasks for the agent
11/ Click + to add the msbuild step at the agent level
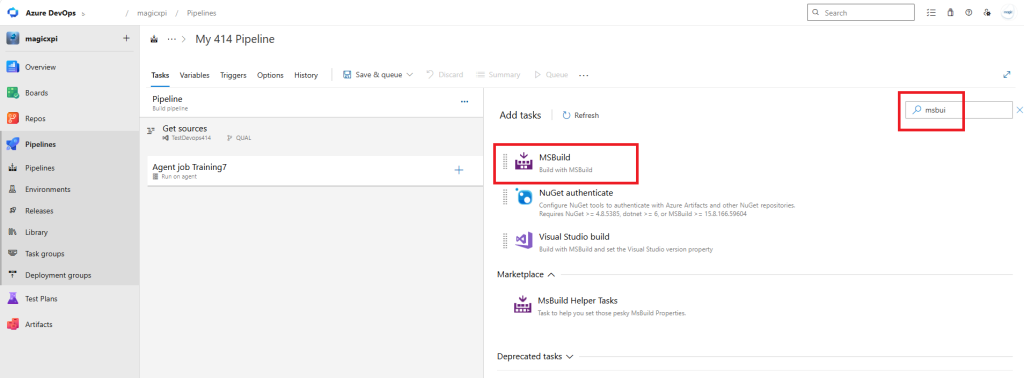
Click add and configure the msbuild like below
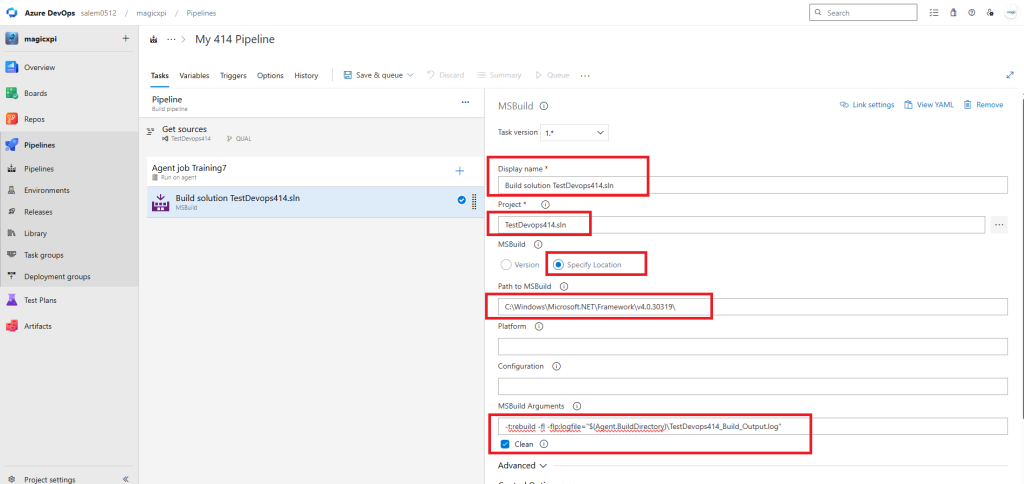
MS Build : C:\Windows\Microsoft.NET\Framework\v4.0.30319\
MSBuild Arguments : -t:rebuild -fl -flp:logfile= »$(Agent.BuildDirectory)\TestDevops414_Build_Output.log »
This step will be responsible to rebuild the project.
12/ Add a copy files step like below
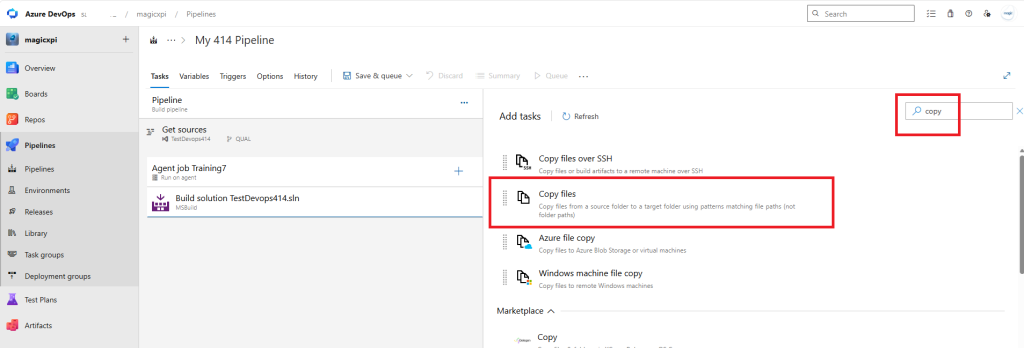
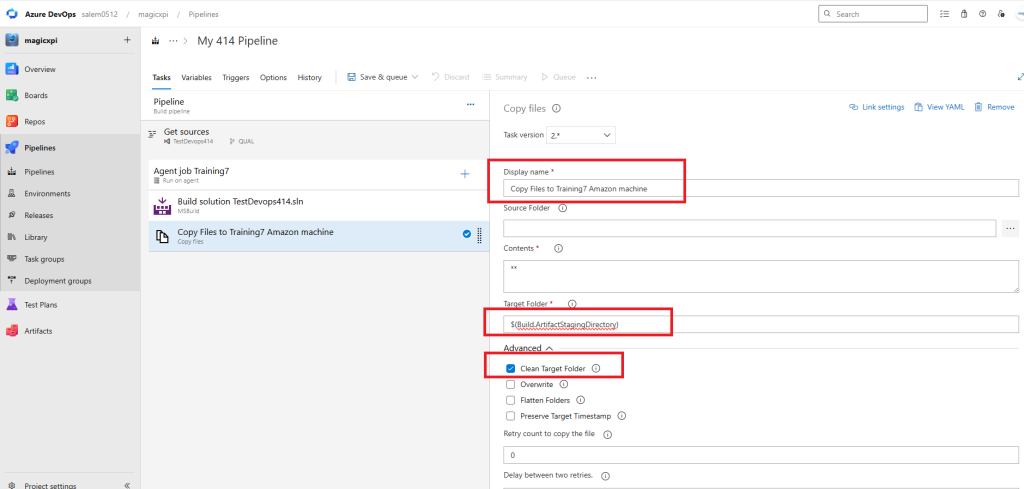
Target folder : $(Build.ArtifactStagingDirectory)
Don’t forget to tick the Clean Target Folder
13 /Add an Archive Step like below
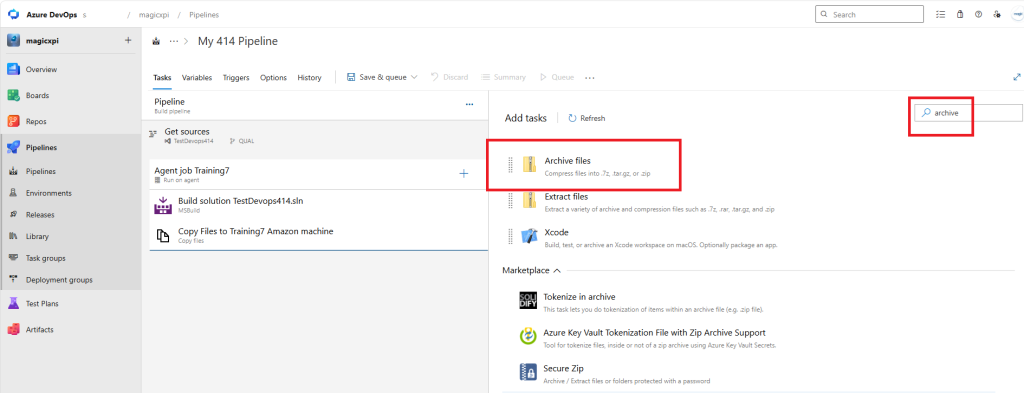
Keep the default parameters
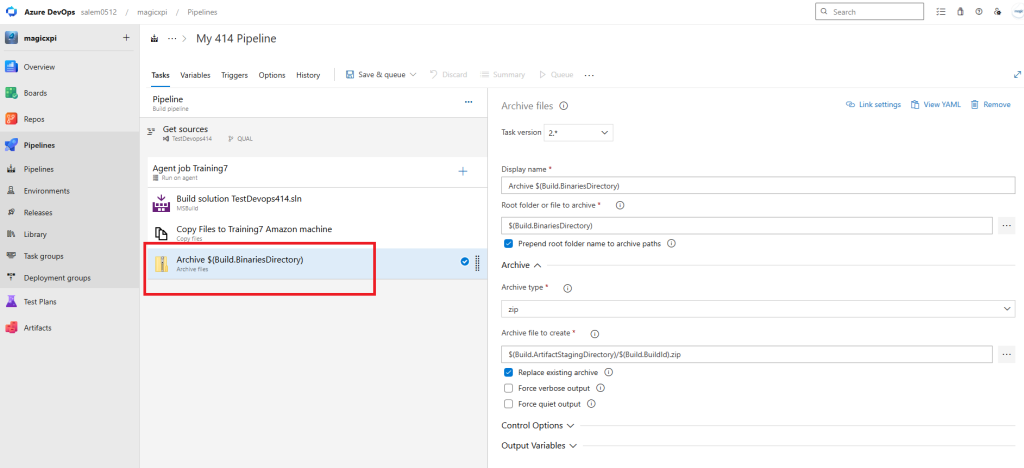
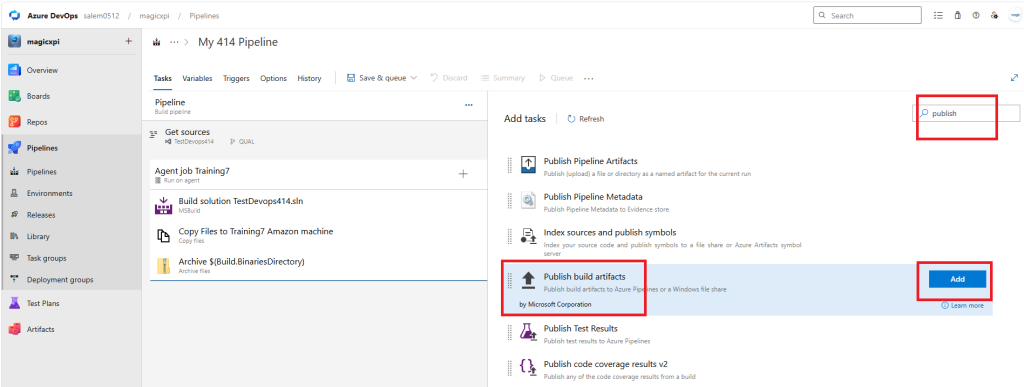
14/ Add a publish build artifact step
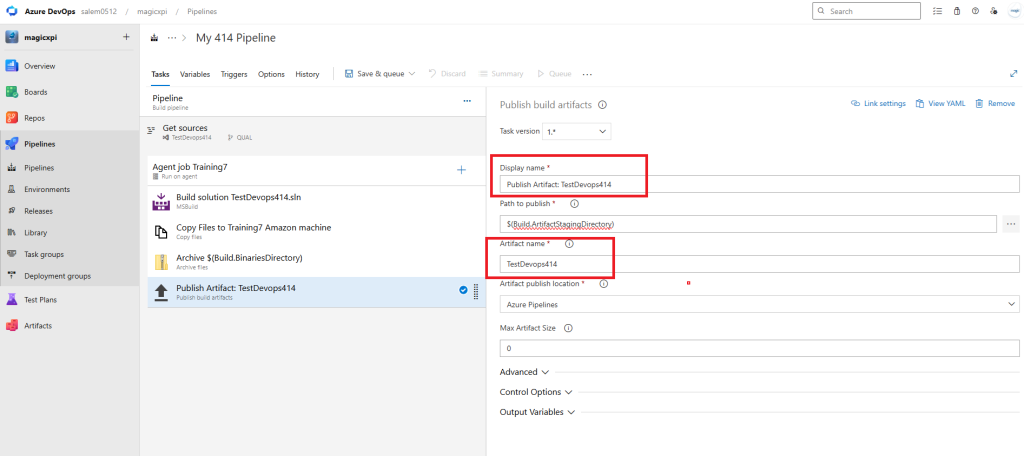
Change the Display Name and Artifact name like below
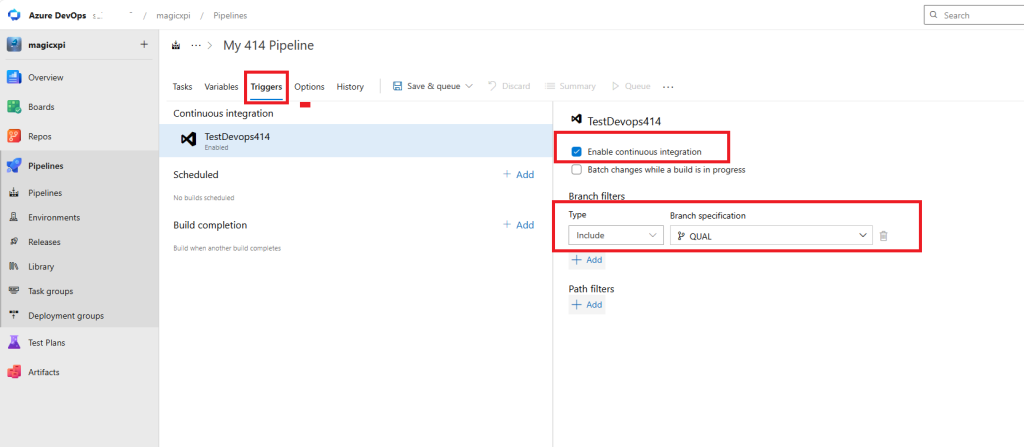
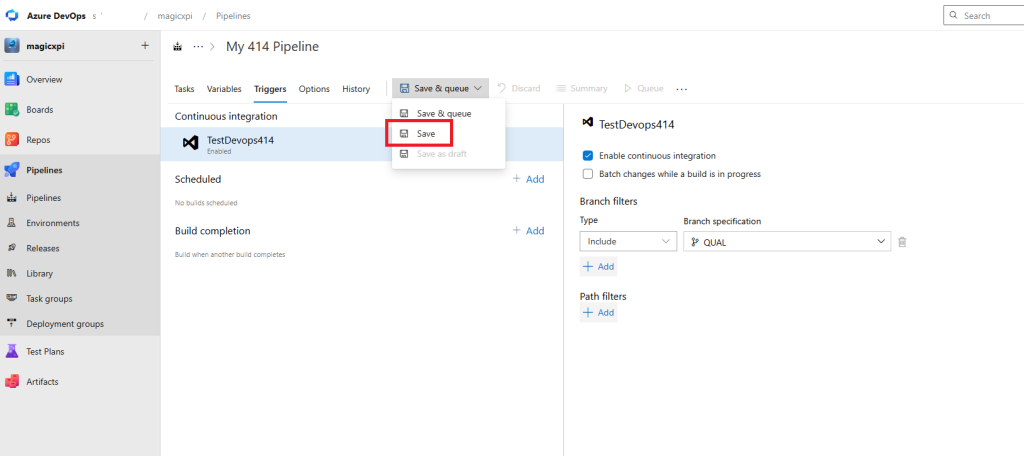
Click on Triggers menu and check Enable continous integration and branch specification QUAL
Save your pipeline
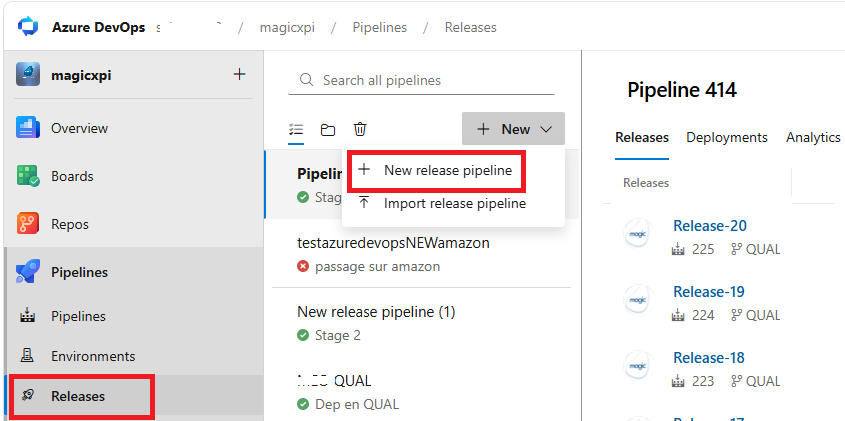
15/ Create a new Release pipeline
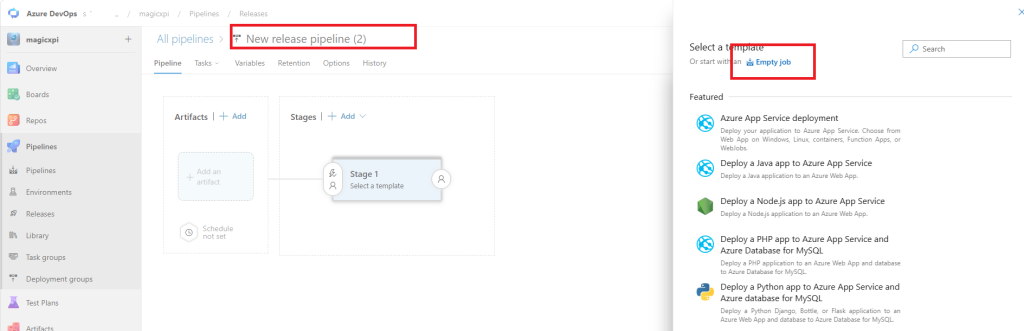
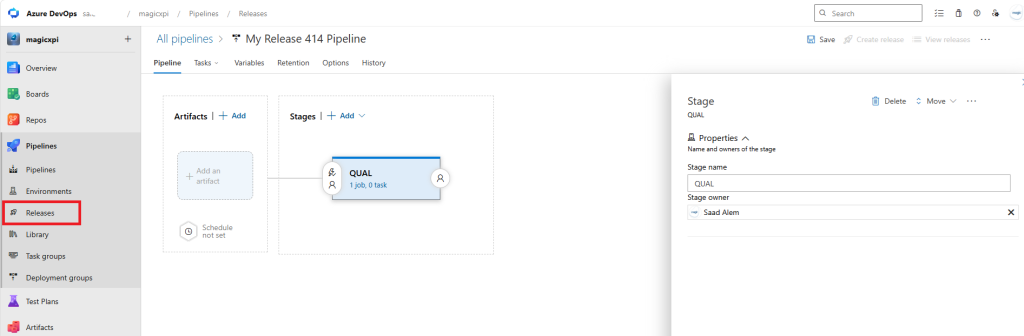
Choose Empty job, change the release pipeline name and change the stage to QUAL
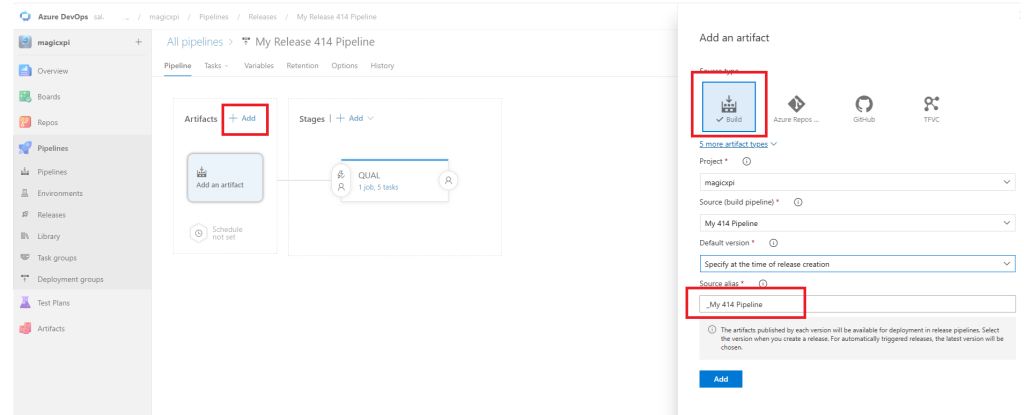
16/ Clic Add artifact and configure it like below
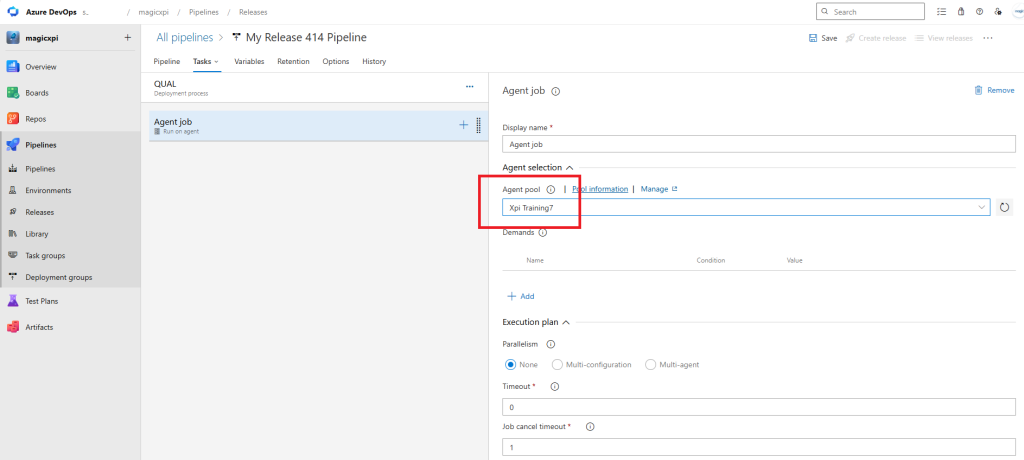
At the Agent Job level, set the agent pool
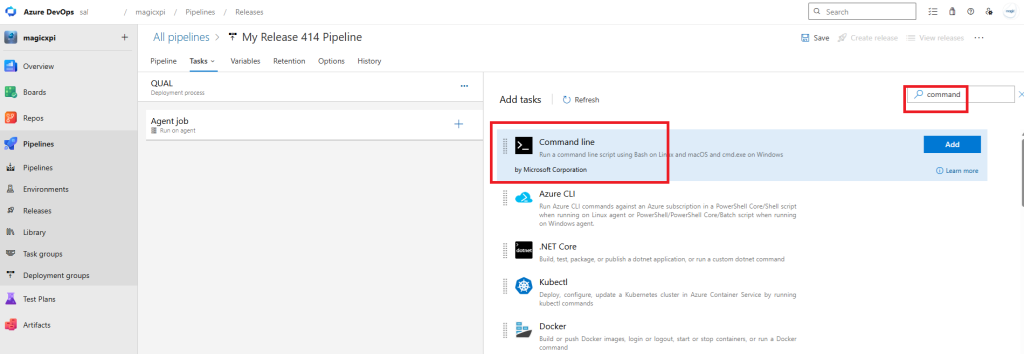
17/ Add 5 steps like below (3 command lines, 1 copy file and 1 powershell script)
The first step stops the project if it’s running
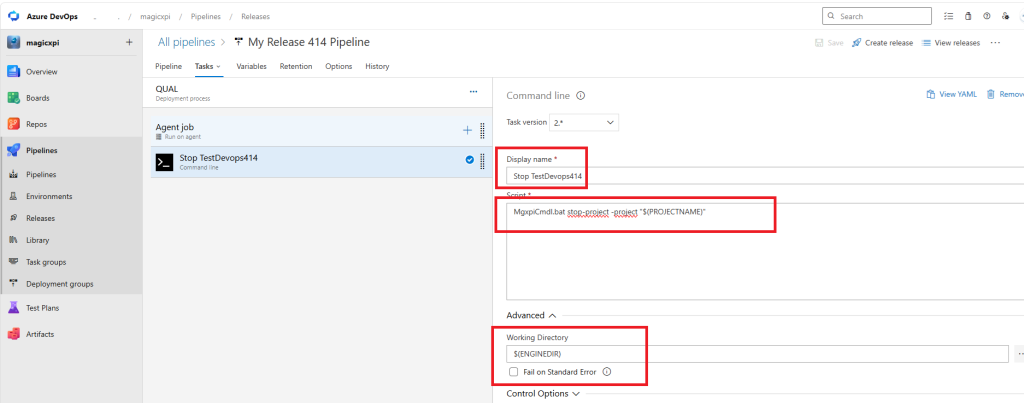
Script : MgxpiCmdl.bat stop-project -project « $(PROJECTNAME) »
Working Directory : $(ENGINEDIR)
The second step copy the project files from work directory to your projects directory
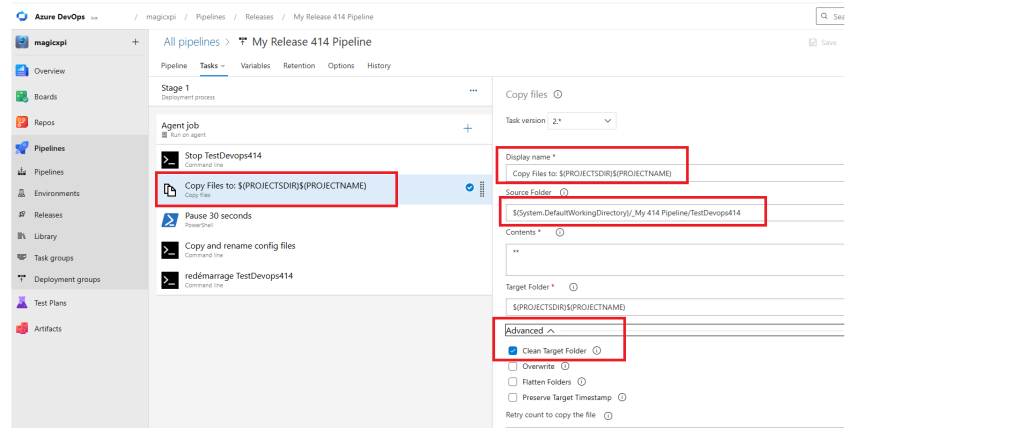
Display name : Copy Files to: $(PROJECTSDIR)$(PROJECTNAME)
Source Folder : $(System.DefaultWorkingDirectory)/_My 414 Pipeline/TestDevops414
Target Folder : $(PROJECTSDIR)$(PROJECTNAME)
Don’t forget to tick Clean Target Folder
The Third step sets a pause of 30 secs (this step can be done just after the Stop project step)
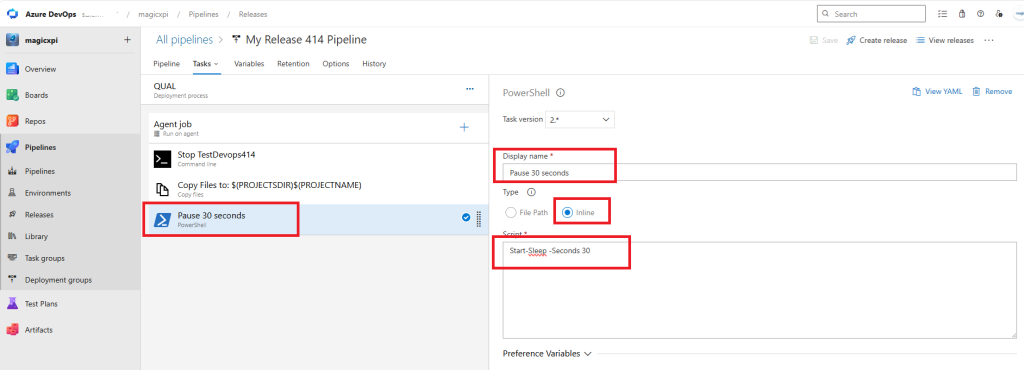
Script : Start-Sleep -Seconds 30
The fourth step replaces all the necessary config files
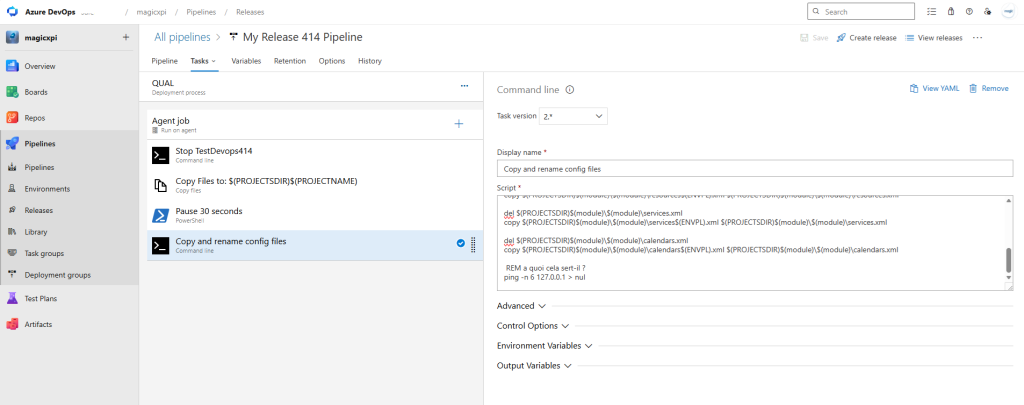
Use this script
REM - variable module

echo Environnement :  $(ENVPL)
echo Replace configuration files

REM fichier de démarrage
del $(PROJECTSDIR)$(module)\$(module)\start.xml
copy $(PROJECTSDIR)$(module)\$(module)\start$(ENVPL).xml $(PROJECTSDIR)$(module)\$(module)\start.xml

REM triggers de démarrage
del $(PROJECTSDIR)$(module)\$(module)\start.xml.triggers
copy $(PROJECTSDIR)$(module)\$(module)\start.xml$(ENVPL).triggers $(PROJECTSDIR)$(module)\$(module)\start.xml.triggers

del $(PROJECTSDIR)$(module)\$(module)\ifs.ini
copy $(PROJECTSDIR)$(module)\$(module)\ifs$(ENVPL).ini $(PROJECTSDIR)$(module)\$(module)\ifs.ini

del $(PROJECTSDIR)$(module)\$(module)\resources.xml
copy $(PROJECTSDIR)$(module)\$(module)\resources$(ENVPL).xml $(PROJECTSDIR)$(module)\$(module)\resources.xml

del $(PROJECTSDIR)$(module)\$(module)\services.xml
copy $(PROJECTSDIR)$(module)\$(module)\services$(ENVPL).xml $(PROJECTSDIR)$(module)\$(module)\services.xml

del $(PROJECTSDIR)$(module)\$(module)\calendars.xml
copy $(PROJECTSDIR)$(module)\$(module)\calendars$(ENVPL).xml $(PROJECTSDIR)$(module)\$(module)\calendars.xml

 REM a quoi cela sert-il ?
ping -n 6 127.0.0.1 > nul
The fifth step restarts the project
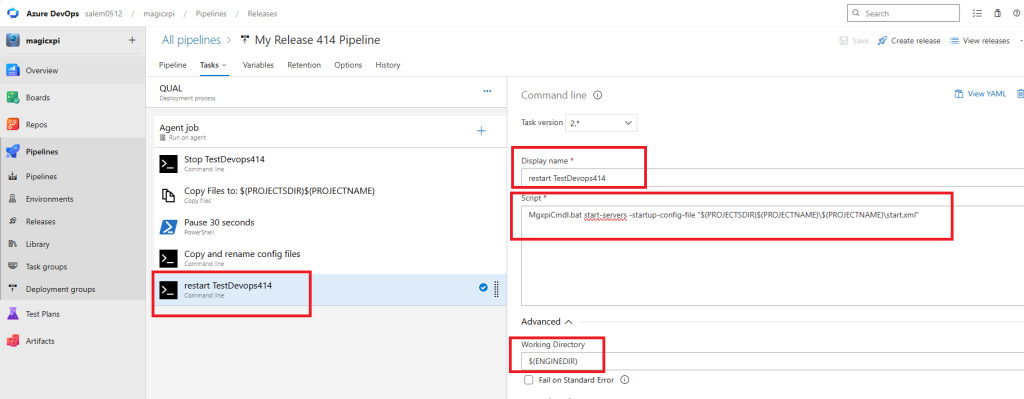
Script : MgxpiCmdl.bat start-servers -startup-config-file « $(PROJECTSDIR)$(PROJECTNAME)\$(PROJECTNAME)\start.xml »
Don’t forget to set the Working Directory with : $(ENGINEDIR)
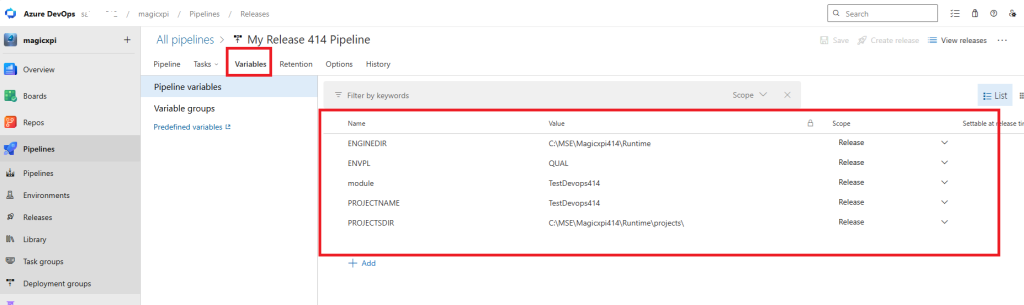
18/ Define all the necessary environment variables like below
Click on Variables
19/ Duplicate all project environment files and change the credentials for Qualification (QUAL) in each files
This step must be done before Git push (see step 1/)
- IFS.INI => IFSQUAL.INI
- START.XML => STARTQUAL.XML
- START.XML.TRIGGERS => START.XMLQUAL.TRIGGERS
- RESOURCES.XML => RESOURCESQUAL.XML
- SERVICES.XML => SERVICESQUAL.XML
- CALENDARS.XML => CALENDARSQUAL.XML
20/ Create a Pull Request from DEV=>QUAL
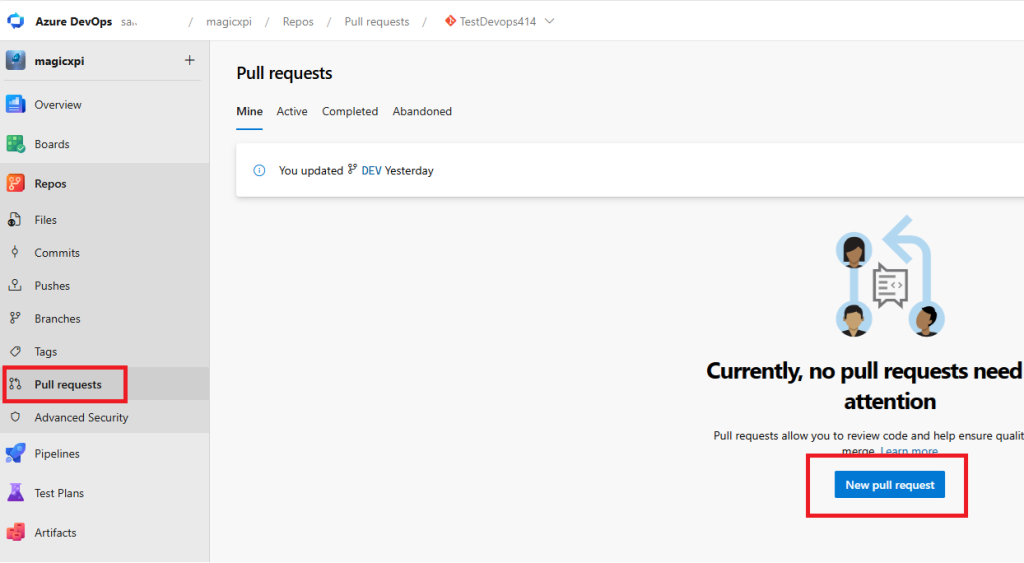
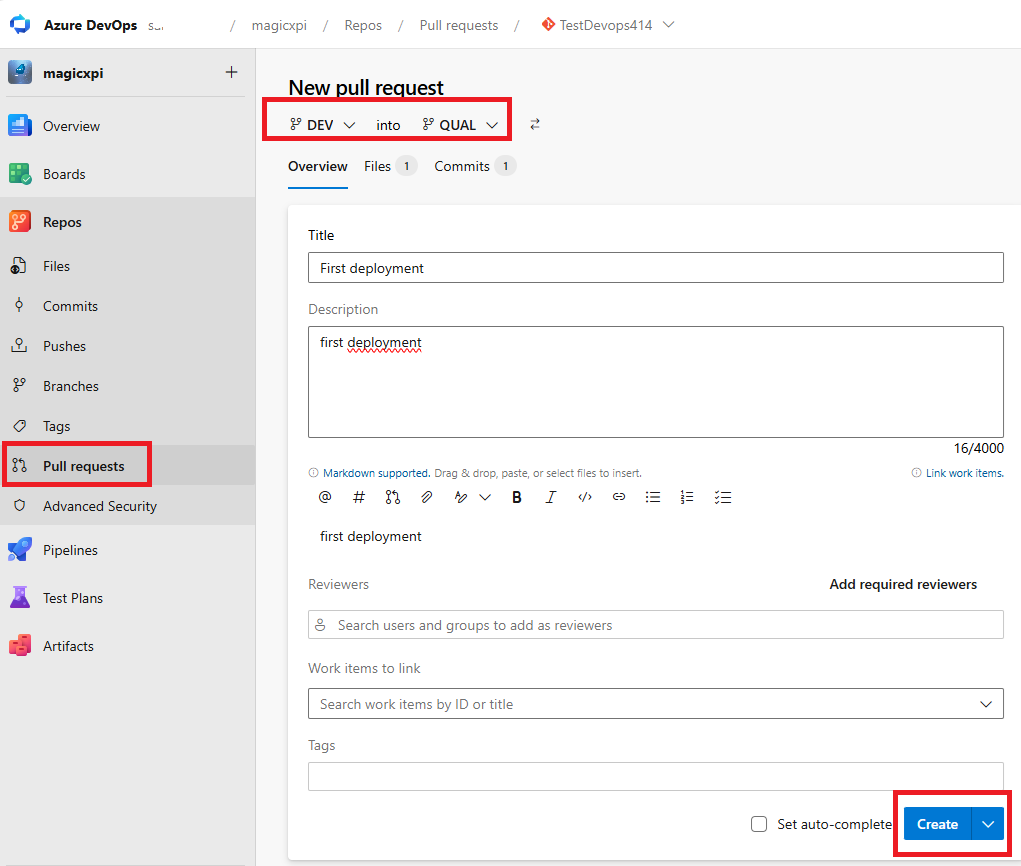
Click Complete
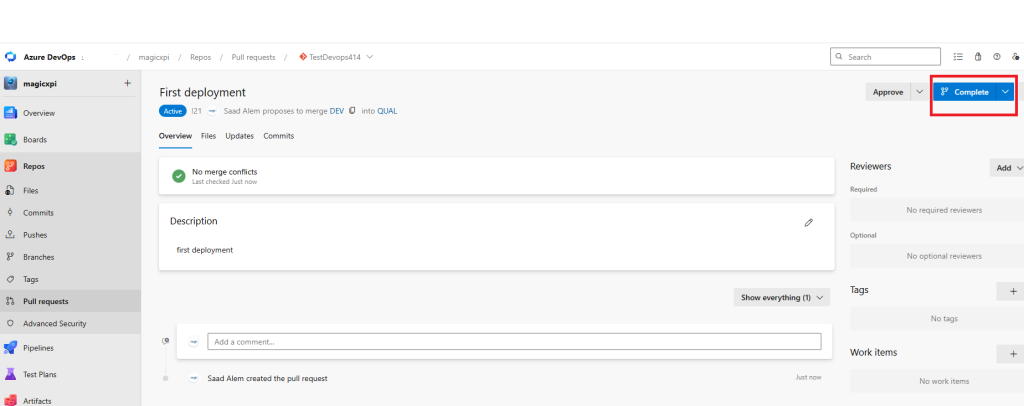
Click Complete merge
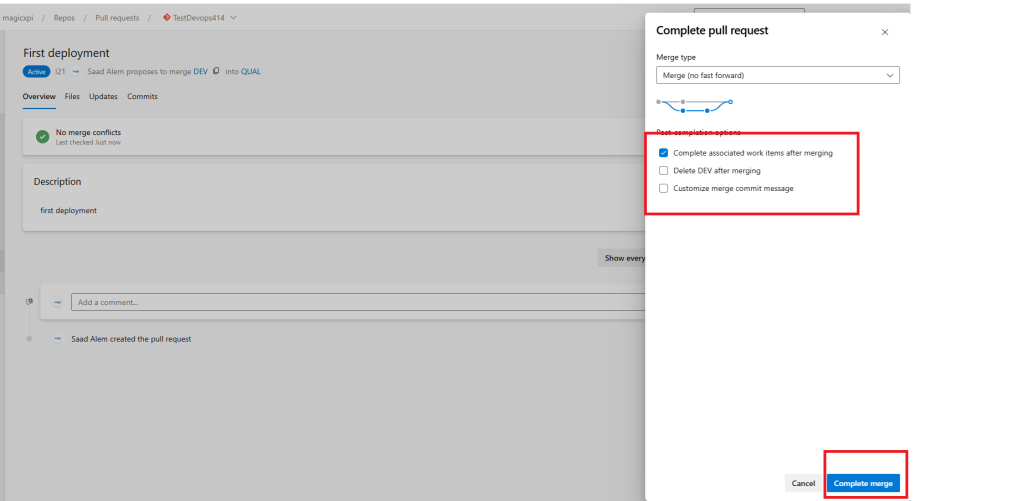
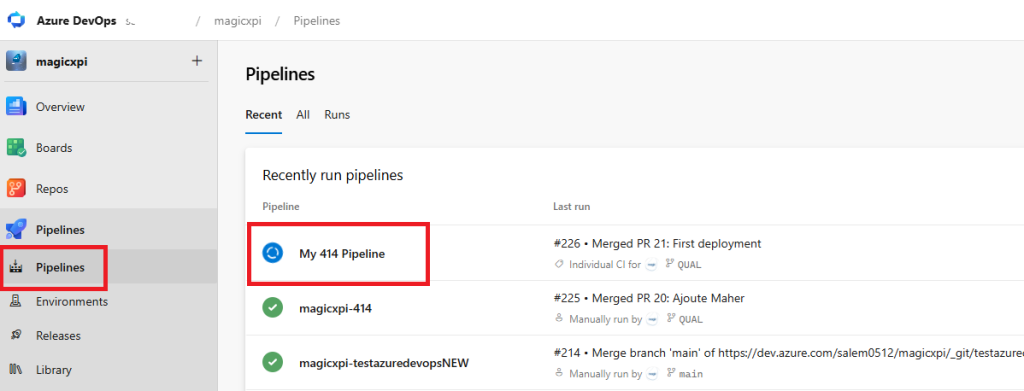
21/ Automatically the pipeline is triggered
Check that the pipeline has ran successfully and that an artifact has been produced
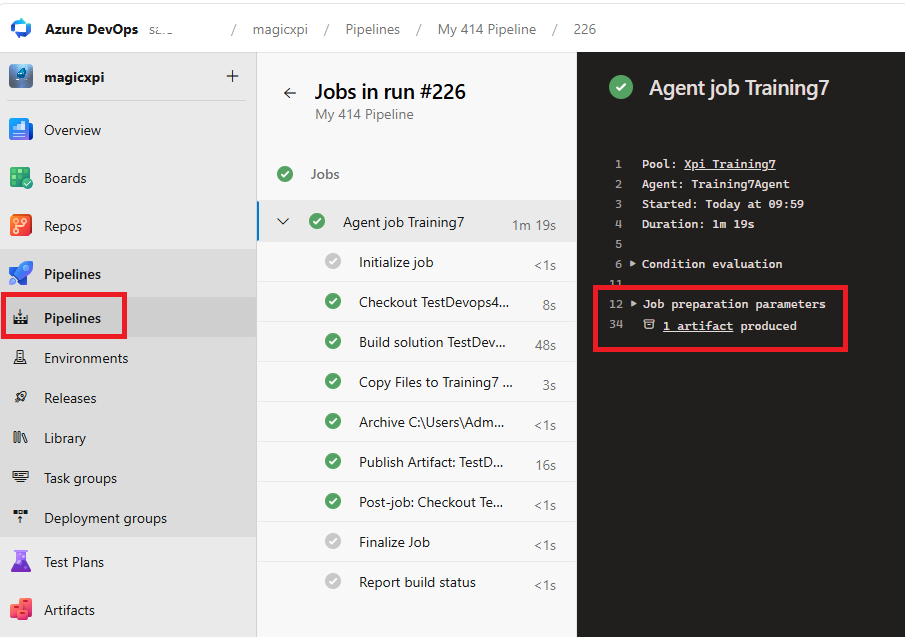
You can check that the artifact has been copied on the remote machine.
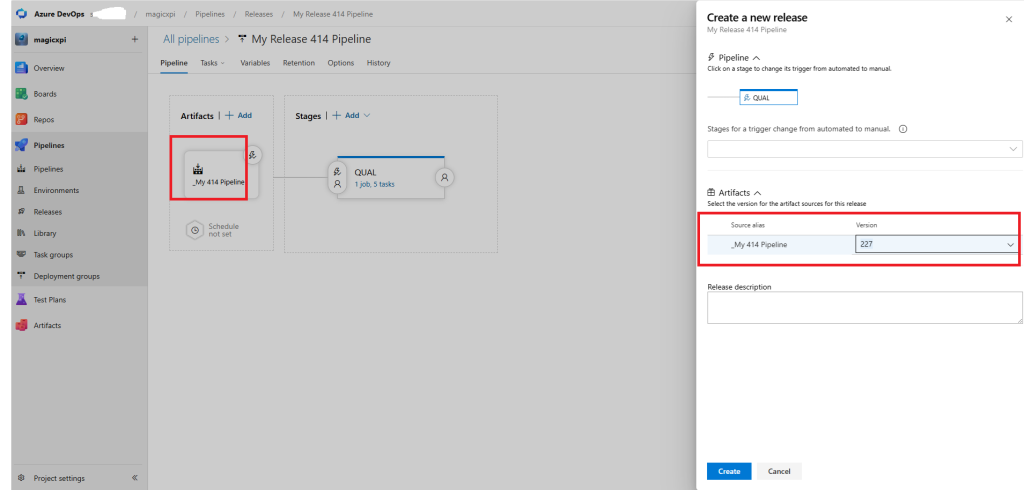
22/ Create a release
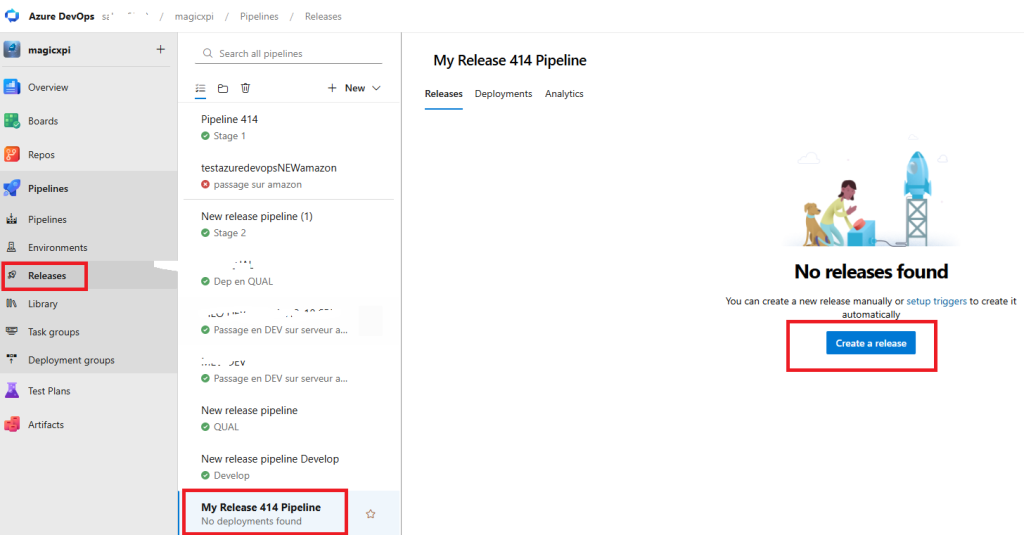
Choose the last version of the artifact and click Create then click on Release-1
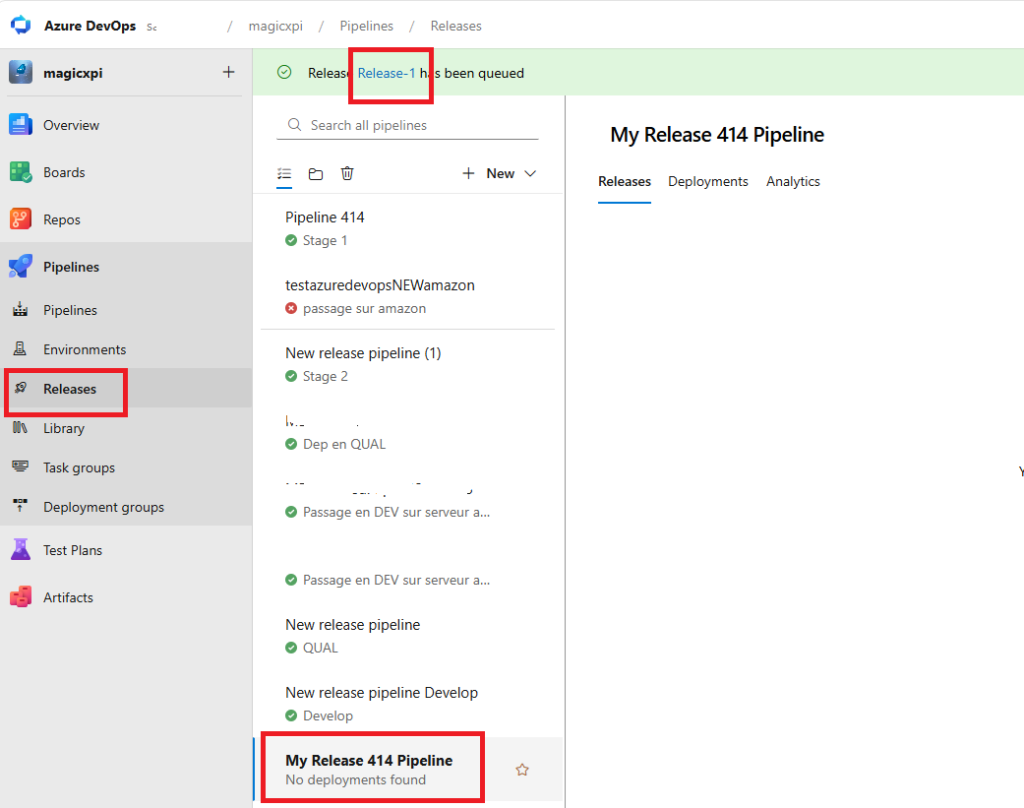
Then click on Logs to get the detail of the execution
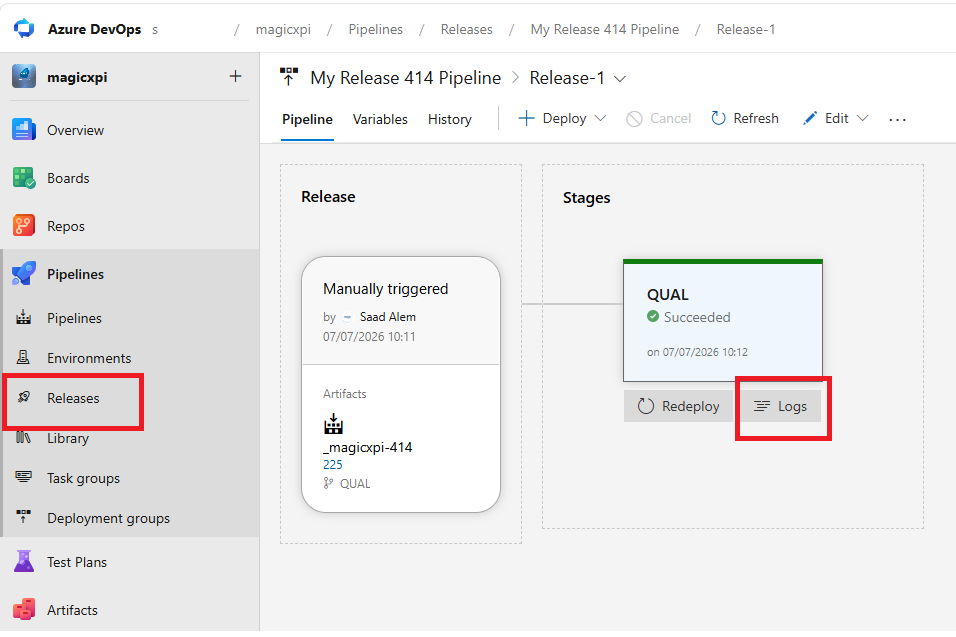
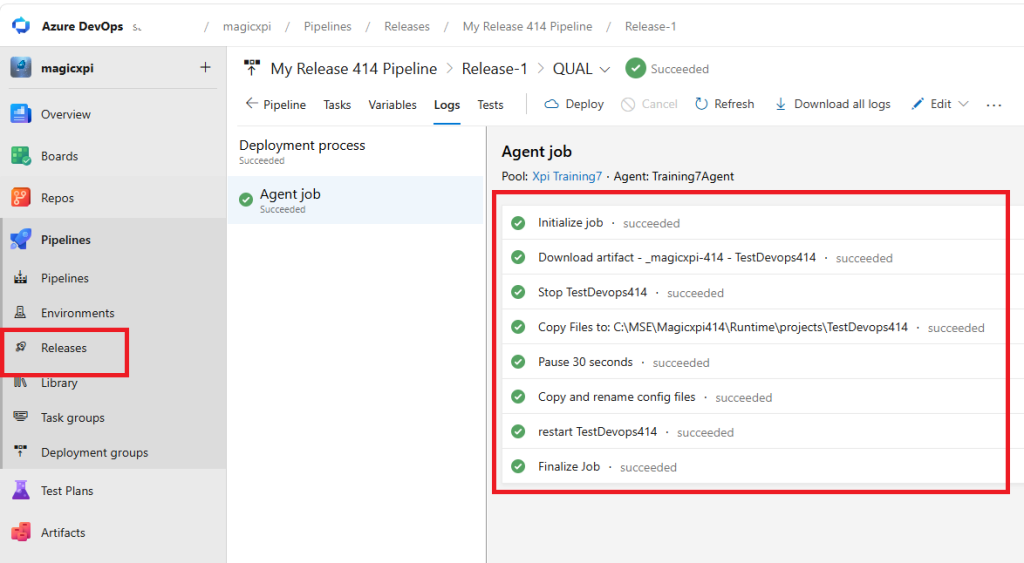
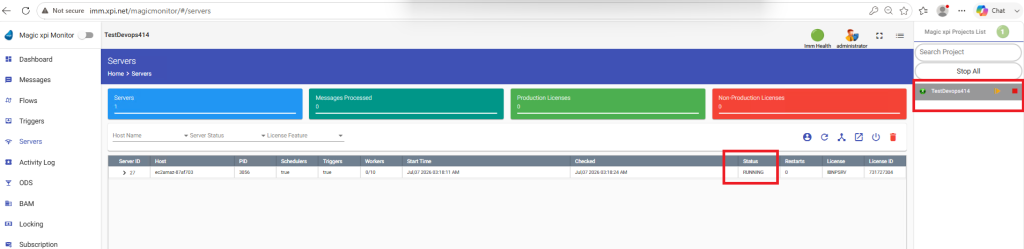
You can control on the remote machine that the project has been redeployed and is running
23/ If you want to automatize the execution of the Release pipeline (Continous Integration) each time a Pull Request is created then you should do this
Edit the release pipeline like below

Enable Continous deployment trigger and Pull request trigger with Branch QUAL
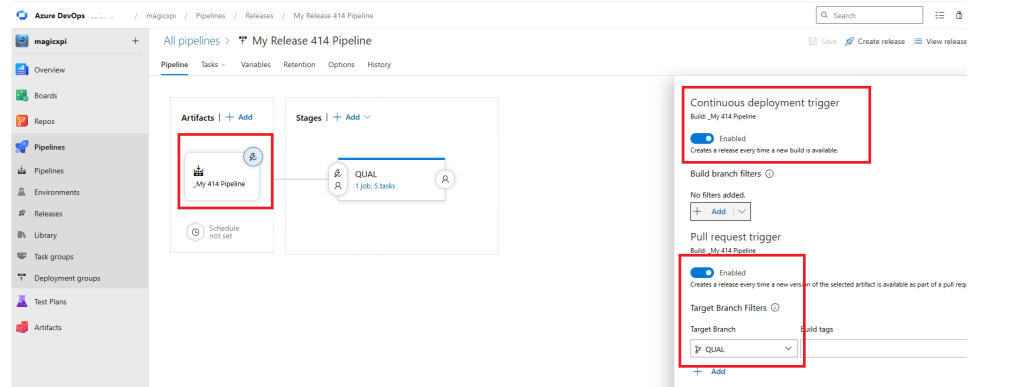
By doing this, each time you create a Pull Request, pipeline (to produce the artifact) and release pipeline will be triggered and your project will be updated and up and running on the remote machine with the latest version.
Make a small change in your project, commit and push the modification and then create a new pull request.
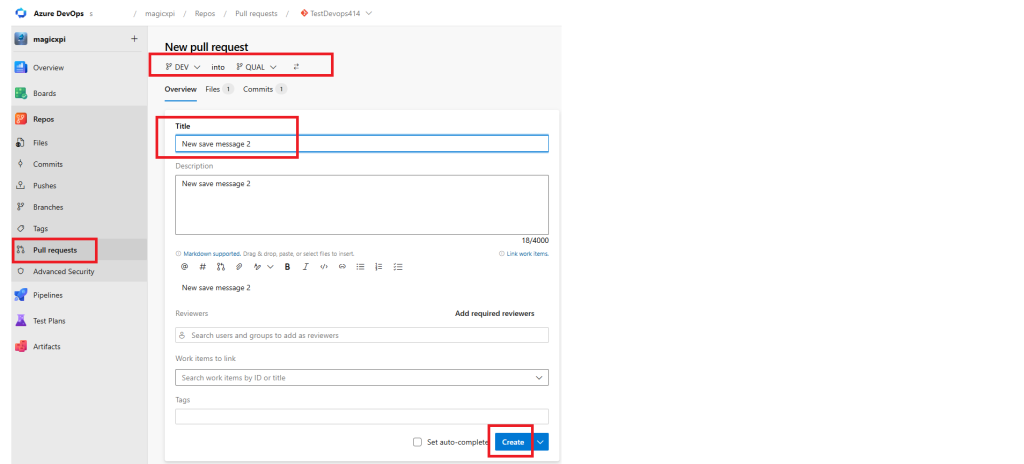

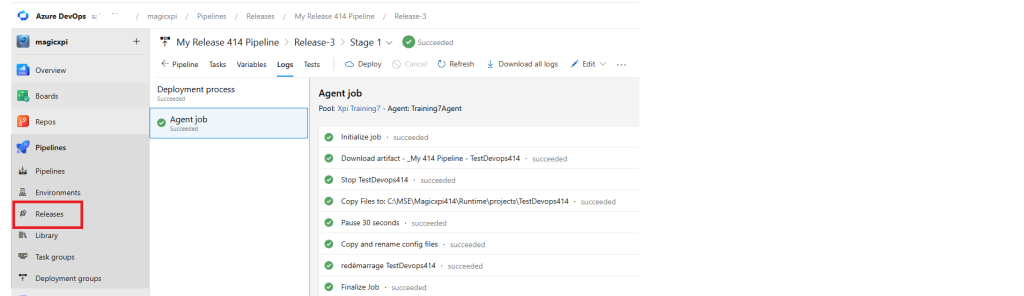
24/ You can reconfigure the agent if you want to run it as a service.
Simply run : .\config.cmd
and follow the steps
25/ You can customize the Overview via the README.md file with the status of the build and the status of the deployment.
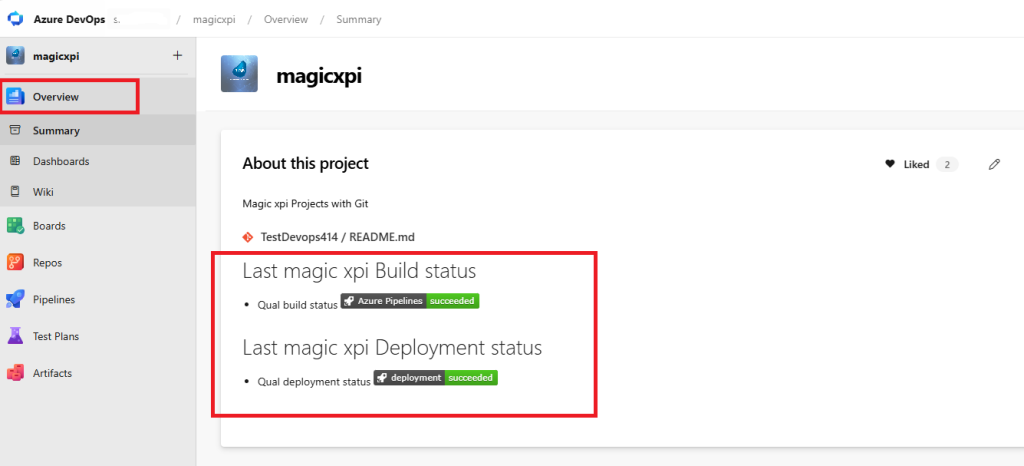
You have to edit the README.md file (main branch)
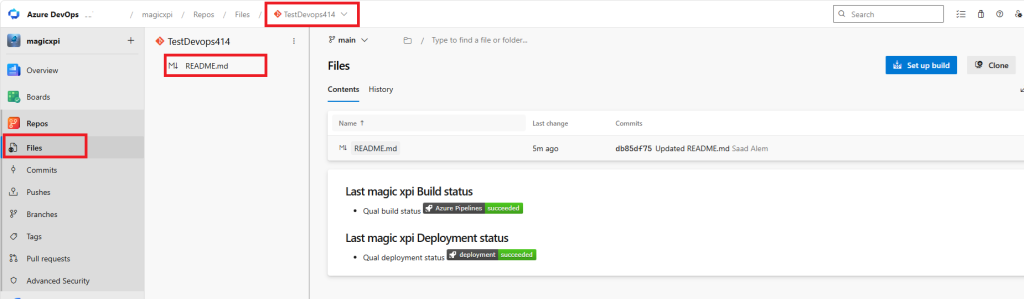
Click on README.md and click Edit
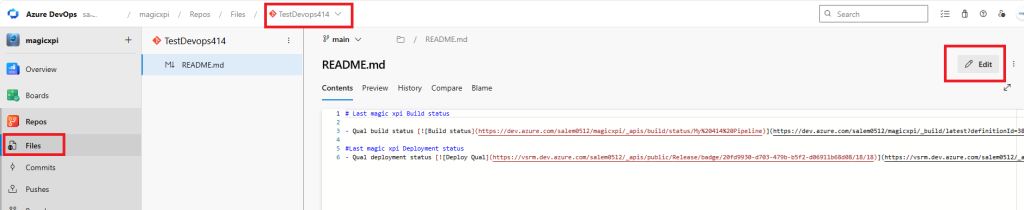
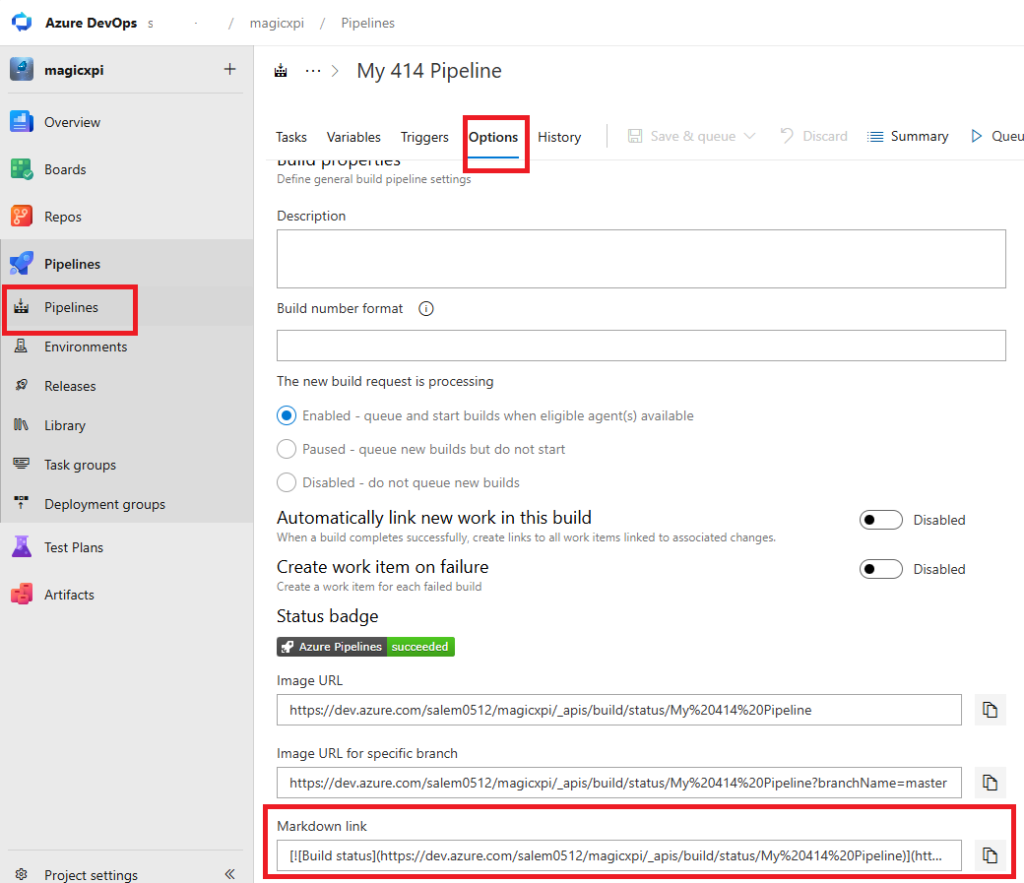
Copy the markdown link for build status
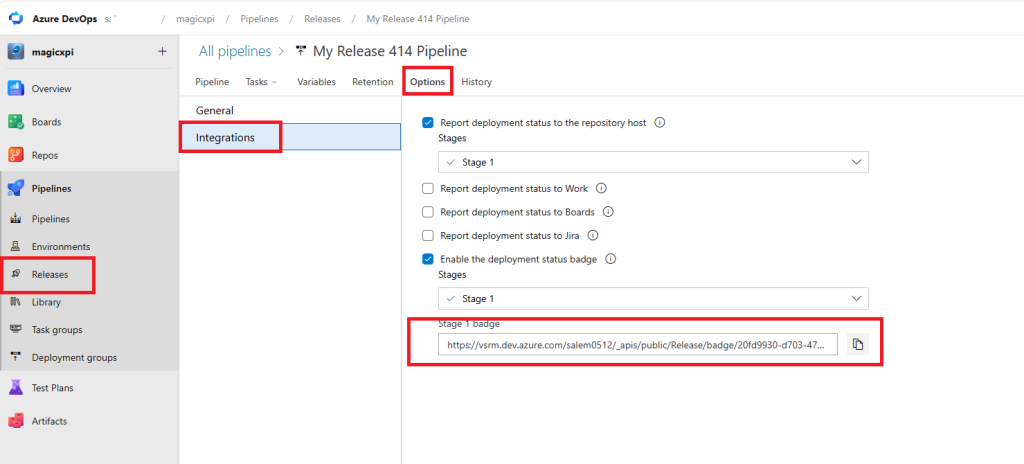
Copy the markdown link for deployment status and add [![Deploy Qual]
# Last magic xpi Build status
- Qual build status []
#Last magic xpi Deployment status
- Qual deployment status []